fat bottom

fat bottom

Friday, March 30, 2012

cake batter rice krispie treats... and a guest blogpost


 happy Friday everyone... i am absolutely thrilled that it's the weekend already... the week countdown until my hubby comes home has begun... the little guys are so excited for his return... i think they are even more excited for the following week when i go to France for 12 days leaving the three of them to do lots of fun boy stuff... as my oldest Jack keeps saying "we are going to rock the house out mom!"... oh lord, i can only imagine... my hubs has never spent more than 1 day/night by himself with both of the boys... i've already made a very detailed (color coated) schedule so the hubs has a bit of a heads-up... sometimes it's like i have 3 kids (just kidding)...

so... i saw this recipe on pinterest the other day, and being that it only took about 5 minutes to make and consisted of about 5 ingredients, i figured i would give it a go... the only thing was that i had to buy a box of yellow cake mix.. i cannot remember the last time i bought cake mix... but since the reviews of these treats were raving... i got myself to the store and bought myself a box of duncan hines yellow butter cake mix...
and as for these treats... the reviews were spot on... they were sooooo good...what a fun way to amp up rice krispie treats!
cake batter rice krispie treats:
ingredients:

3 Tbsp. butter
1 (10 oz.) bag of mini-marshmallows
1/3 cup yellow cake mix (the dry cake mix, not prepared into a batter!)
6 cups crispy rice cereal
a few dashes of cinnamon
sprinkles

directions:
1. melt and brown butter in a large saucepan over low heat and add marshmallows, and stir until they begin to melt, and dash in a bit of cinnamon
2. begin adding in the cake mix one spoonful at a time so its combined
3. stir in the cereal, and mix it so it is completely coated with marshmallow mixture
4. press into a baking dish and top with sprinkles... then let  them sit for about 30 minutes before cutting

and i have a great announcement... starting today, my sister and i will be collaborating on her amazing blog "Jeans and Tees and Travel and Cakes"... so check me out every Friday where i will be sharing more amazing, fun and delicious goodies


until next time... happy baking everyone :)

Tuesday, March 20, 2012

tiramisu... oh! how i love you...

hello hello... good afternoon or evening everyone :) here's a delicious post for you... homemade tiramisu... is there anything better, like seriously... it's like one of the sexiest desserts out there...

i love making this dessert... whether it is in cake form, cupcake form, in trifle form... it's just amazing...what i've never done before though is make it with homemade ladyfingers... i love making it with angel food cake... and i hate to admit this, i may be guilty of purchasing store bought ladyfingers...
but i vow to you here and now, i will never ever EVER purchase those again...

i layered the ladyfingers on the bottom of the pan... drizzled them with espresso, then with sweet billowy kahlua infused mascarpone, chopped chocolate chunks... then repeat until you just cant fit anymore in the dish... then finally, i topped it with sweetened vanilla bean whipped cream and sprinkles of cinnamon and cocoa powder...

 how does that sound... pretty darn amazin!

homemade ladyfingers:
ingredients:

1/2 cup powdered sugar for dusting the ladyfingers, plus extra for dusting the baking sheets
7 large eggs, separated
3/4 cup plus 4 tablespoons granulated sugar
2 teaspoons vanilla extract
1 cup all-purpose flour

directions:
1. preheat the oven to 375 degrees, then line two 12 x 17-inch baking sheets with parchment paper or silicon mats
2. use a fine-mesh sieve to dust the paper with a light coating of powdered sugar
3. using a mixer fitted with a paddle attachment, beat the egg yolks, the 3/4 cup granulated sugar, and the vanilla in a large bowl on high speed about 5 mintues, until the yolks become thick and pale yellow
4. in a separate clean, large bowl, use a mixer fitted with a whisk attachment to beat the egg whites on high speed until stiff peaks form... then add the 4 tablespoons granulated sugar, 1 tablespoon at a time, beating after each addition
5. fold the egg white mixture gently into the egg yolk mixture, use a sieve to gently sift the flour over the batter and gently fold in the flour just until incorporated
6.spoon the batter into a pastry bag fitted with a large round tip, then pipe the batter onto the prepared baking sheets, making each ladyfinger about 4 inches long and 2 inches wide... then bake about 10 minutes, until lightly browned
7. sift the 1/2 cup powdered sugar over the ladyfingers just as they come out of the oven... cool for 5 minutes and use a spatula to transfer them from the baking sheet to the cooling racks
  

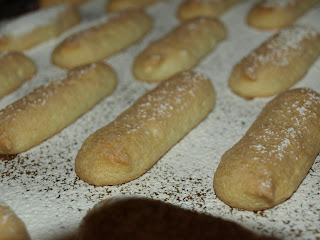
little ladyfingers all piped and sprinkled with confectioners sugar...

nice and crispy and spongy after a quick bake in the oven... i am never buying store bought ladyfingers ever again...

i put it together in a bread/loaf pan... next time i am going all out and use a spring form pan to make it look more clean and professional... but you know what, it was just for me... so i kept it simple


happy baking everyone :)